- Published on
How to Setup a Full-Stack Web Application Using React, Node.js, and MongoDB
- Authors

- Name
- Joshua Yin
- @ijaeshi
Tags
Previous Article
Overview of the Application
In this tutorial, we'll learn how to build a simple yet functional web application using React, Node.js, and MongoDB. In particular, we'll create a note-taking app that allows users to create, read, update, and delete notes. By the end, you'll gain hands-on experience setting up a full-stack environment, with React powering the front-end, Node.js handling the back-end server, and MongoDB managing data storage.
Readers should have some familiarity with JavaScript, React, Node.js, and MongoDB. Our goal is to learn how to integrate these technologies to build a functioning full-stack web application. You can follow along with the tutorial by visiting the GitHub repository.
Prerequisites
Software Requirements
Node.js and npm: Node.js is essential for running and developing applications that require server-side logic. npm (Node Package Manager) comes bundled with Node.js and is used for managing dependencies in the project. Ensure you have the latest version of Node.js and npm installed on your development machine.
MongoDB: You'll need to have MongoDB installed and running on your machine to store and retrieve application data. MongoDB is one of the most popular databases and offers both flexibility and scalability for applications, making it a suitable choice for our note-taking app.
Setting up a Development Environment
Install Node.js and npm: Download and install Node.js from the official website. Installing Node.js should also install npm on your machine, but you can verify the installation by running
node -vandnpm -vin your terminal or command prompt.Install MongoDB: Follow the installation guide on the MongoDB official documentation to set up MongoDB on your machine. After installation, ensure that MongoDB is running by checking its service status or by connecting through the MongoDB CLI.
Code Editor: Although not a requirement, using a powerful code editor like Visual Studio Code, Sublime Text, or Neovim can significantly enhance your development experience. These editors offer syntax highlighting, code completion, and other features beneficial for web development.
Browser: A modern web browser such as Google Chrome, Mozilla Firefox, or Safari for testing and debugging the web application.
Command Line Tools: Familiarity with basic command line operations is necessary, as you'll need to execute various commands for setting up and running the project components.
Git (Optional): Version control is crucial in software development. Git helps track changes, collaborate with others, and manage your codebase effectively. While not mandatory for this project, using Git is highly recommended.
With these prerequisites addressed, you're now ready to start setting up the development environment and working on the project.
Front-End Setup with React
- Open your terminal or command prompt.
- Navigate to the directory where you want to create your new React application.
- Run the following command to create a new React app named
my-note-app(you can replacemy-note-appwith your desired project name):
npx create-react-app my-note-app
- Wait for the command to finish executing. This command sets up a new React project with all the necessary build configurations and dependencies, including generating a starter
App.jsfile. - Change into your project directory:
cd my-note-app
- Start the development server to verify your setup:
npm start
Your default web browser should open automatically to http://localhost:3000/ showing your new React app's auto-generated welcome page.
Installing Necessary Dependencies
- In your project directory, install React Router, which will make it easy to setup seamless navigation between components:
npm install react-router-dom
- If your application requires additional libraries (e.g., form handling, state management, etc.), install them as needed. For example, in a later step we will need to install Axios to make HTTP requests:
npm install axios
Building Basic Components
We won't explain building React components in detail, as it is assumed you already have some basic familiarity working with it. However, we will provide example code for the components that may be useful in interacting with the backend once we have set it up properly.
- Inside the
srcfolder, create a new directory namedcomponentsto organize your React components. - Inside the
componentsdirectory, create a new file namedNoteList.js. This component will display a list of notes. - Open
NoteList.jsand add the following code to define a basic functional component:
// NoteList.js
import React from "react";

function NoteList() {
  return (
    <div>
      <h2>Notes</h2>
      {/* Notes will be displayed here */}
      <ul>
        <li>Note 1</li>
        <li>Note 2</li>
        <li>Note 3</li>
      </ul>
    </div>
  );
}

export default NoteList;
- Create additional components following a similar pattern, such as
NoteForm.jsfor adding or editing notes, andNote.jsfor displaying a single note:
// NoteForm.js
import React from 'react';

function NoteForm() {
  return (
    <div>
      <h2>Add/Edit Note</h2>
      {/* Form for adding or editing a note */}
      <form>
        <input type="text" placeholder="Title" />
        <textarea placeholder="Write your note here..."></textarea>
        <button type="submit">Save Note</button>
      </form>
    </div>
  );
}

export default NoteForm;
// Note.js
import React from 'react';

function Note({ title, content }) {
  return (
    <div>
      <h3>{title}</h3>
      <p>{content}</p>
    </div>
  );
}

export default Note;
- Once you have your basic components, integrate them into your application's main file
App.jsusing React Router to enable navigation between components:
import React from "react";
import { Route, Routes } from "react-router-dom";
import NoteList from "./components/NoteList";
import NoteForm from "./components/NoteForm";
import Note from "./components/Note";

function App() {
  return (
    <Routes>
      {/* Route to display NoteList */}
      <Route path="/" element={<NoteList />} />
      {/* Route to display NoteForm for adding/editing */}
      <Route path="/note-form" element={<NoteForm />} />
      {/* Route to display a single Note */}
      <Route path="/note/:id" element={<Note />} />
    </Routes>
  );
}

export default App;
- Finally, navigate to
index.jsand wrap the<App />component with<BrowserRouter></BrowserRouter>:
// index.js
root.render(
  <React.StrictMode>
    <BrowserRouter>
      <App />
    </BrowserRouter>
  </React.StrictMode>,
);
By completing these steps, you'll have set up a basic front-end for your application using React. This setup allows you to start developing the user interface and preparing for integration with the back-end services you'll create using Node.js.
Back-End Setup with Node.js
Setting up a Node.js Server
Create a new directory for your back-end code, separate from your React application, or navigate to a specific folder dedicated to server-side code within your project structure.
Initialize a new Node.js project within this directory by running:
npm init -yThis command creates a
package.jsonfile in your directory, which will keep track of your project's dependencies and scripts.Install Express, a popular web framework for Node.js that greatly simplifies the process of setting up a server in Javascript:
npm install expressCreate a new file named
server.jsin your directory. Openserver.jsand add the following code to define a basic Express server:const express = require('express'); const app = express(); const PORT = process.env.PORT || 3001; app.use(express.json()); // Middleware to parse JSON bodies app.get('/', (req, res) => { res.send('Hello, world!'); }); app.listen(PORT, () => { console.log(`Server is running on port ${PORT}`); });Start your Node.js server by running:
node server.jsVisit
http://localhost:3001/in your web browser. You should see "Hello, world!" displayed, indicating your server is running successfully.
Installing Required Packages
Beyond Express, your application will need additional packages for various functionalities:
mongoose: For interacting with MongoDB. Install by running:
npm install mongoosecors: To enable CORS (Cross-Origin Resource Sharing) with various options. Install by running:
npm install corsdotenv: To load environment variables from a
.envfile intoprocess.env, making it easier to manage your application's configuration. Install by running:npm install dotenv
After installing these, don't forget to require them in your server.js or appropriate files where you'll use them.
Creating API Endpoints
Now we will define a few API endpoints to use in our App. These endpoints enable some of the basic functionality a user might expect from a note-taking app, such as saving notes to the server and retrieving notes.
Define a route file for your notes. Create a new folder called
routesand within it, a file namednoteRoutes.js. This file will handle all note-related routes.Inside
noteRoutes.js, set up your routes:
const express = require("express");
const router = express.Router();

// Enable CORS for all routes in this router
const cors = require("cors");
router.use(cors());

// Mock array of notes for demonstration
let notes = [
  { id: 1, title: "Sample Note", content: "This is a sample note." },
];

// Get all notes
router.get("/notes", (req, res) => {
  res.json(notes);
});

// Add a new note
router.post("/notes", (req, res) => {
  const newNote = {
    id: notes.length + 1,
    title: req.body.title,
    content: req.body.content,
  };
  notes.push(newNote);
  res.status(201).send(newNote);
});

// Update a note by ID
router.put("/notes/:id", (req, res) => {
  const { id } = req.params;
  const { title, content } = req.body;

  const index = notes.findIndex((note) => note.id === parseInt(id));
  if (index !== -1) {
    notes[index] = { id: parseInt(id), title, content };
    res.json(notes[index]);
  } else {
    res.status(404).send("Note not found");
  }
});

// Delete a note by ID
router.delete("/notes/:id", (req, res) => {
  const { id } = req.params;

  const index = notes.findIndex((note) => note.id === parseInt(id));
  if (index !== -1) {
    notes.splice(index, 1);
    res.sendStatus(204); // No content, successful deletion
  } else {
    res.status(404).send("Note not found");
  }
});

module.exports = router;
Integrate your routes into the main server file (
server.js). First, require the route file at the top ofserver.js:const noteRoutes = require('./routes/noteRoutes');Then, use the routes with Express:
app.use('/api', noteRoutes);Restart your server. You now have API endpoints to create and retrieve notes. Test these endpoints using tools like Postman or through your front-end application.
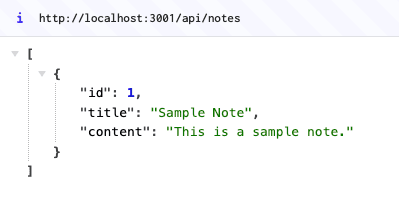
By completing these steps, you've set up a basic Node.js server with Express, installed necessary packages for development, and created API endpoints for handling CRUD (create, read, update, delete) operations. This server will serve as the back-end for your application, ready to connect with your React front-end and MongoDB database for a full-stack application experience.
Database Configuration with MongoDB
Installing and Running MongoDB
Installation:
- Follow the installation guide on the MongoDB official documentation to install MongoDB on your machine. Choose the appropriate installation method for your operating system.
Starting MongoDB:
- After installation, start the MongoDB server. The process varies depending on your operating system, but typically you would run a command like:This command starts the MongoDB server process.
mongod
- After installation, start the MongoDB server. The process varies depending on your operating system, but typically you would run a command like:
Accessing MongoDB Shell (Optional):
- You can also access the MongoDB shell to interact with your MongoDB instance directly. Open a new terminal or command prompt window and run:This opens the MongoDB shell where you can run commands to manage databases, collections, and documents.
mongo
- You can also access the MongoDB shell to interact with your MongoDB instance directly. Open a new terminal or command prompt window and run:
Connecting Node.js to MongoDB
Install Mongoose:
- Mongoose is a MongoDB object modeling tool designed to work in an asynchronous environment. It provides a straight-forward, schema-based solution to model your application data.
- Install Mongoose in your Node.js project:
npm install mongoose
Setting up Connection:
In your
server.jsor main Node.js server file, establish a connection to your MongoDB database using Mongoose:const mongoose = require('mongoose'); require('dotenv').config(); // Connection URI from .env file const uri = process.env.MONGODB_URI; // Connect to MongoDB mongoose.connect(uri, { useNewUrlParser: true, useUnifiedTopology: true, useFindAndModify: false, useCreateIndex: true }); // Check connection const db = mongoose.connection; db.once('open', () => { console.log('Connected to MongoDB database'); }); db.on('error', (error) => { console.error('MongoDB connection error:', error); });
Environment Variables:
Notice that we're using
dotenvto load environment variables. Create a.envfile in your project's root directory and add your MongoDB connection URI. This helps keep sensitive information like database credentials out of your code:MONGODB_URI=mongodb://localhost:27017/my-notes-dbReplace
mongodb://localhost:27017/my-notes-dbwith your actual MongoDB connection URI. You can create a new database for your application or use an existing one.
Model Schema:
Define Mongoose schemas to structure your data. For example, in a
modelsfolder, create a fileNote.js:const mongoose = require('mongoose'); const noteSchema = new mongoose.Schema({ title: { type: String, required: true }, content: { type: String, required: true }, createdAt: { type: Date, default: Date.now } }); const Note = mongoose.model('Note', noteSchema); module.exports = Note;
Basic CRUD Operations
Create:
- To create a new note, you would handle a POST request in your Express route:
const Note = require('../models/Note'); // Add a new note router.post('/notes', async (req, res) => { try { const { title, content } = req.body; const newNote = new Note({ title, content }); await newNote.save(); res.status(201).json(newNote); } catch (error) { res.status(400).json({ message: error.message }); } });Read:
- To retrieve all notes, you would handle a GET request:
// Get all notes router.get('/notes', async (req, res) => { try { const notes = await Note.find(); res.json(notes); } catch (error) { res.status(500).json({ message: error.message }); } });Update:
- For updating a note, handle a PUT request:
// Update a note router.put('/notes/:id', async (req, res) => { try { const { id } = req.params; const { title, content } = req.body; const updatedNote = await Note.findByIdAndUpdate(id, { title, content }, { new: true }); res.json(updatedNote); } catch (error) { res.status(400).json({ message: error.message }); } });Delete:
- Lastly, for deleting a note, handle a DELETE request:
// Delete a note router.delete('/notes/:id', async (req, res) => { try { const { id } = req.params; await Note.findByIdAndDelete(id); res.json({ message: 'Note deleted successfully' }); } catch (error) { res.status(400).json({ message: error.message }); } });Testing:
- You can now test your API endpoints using tools like Postman or by integrating them into your React front-end. Make sure your Node.js server is running alongside MongoDB.
By following these steps, you've successfully configured MongoDB for your Node.js application, established a connection using Mongoose, and implemented basic CRUD (Create, Read, Update, Delete) operations for your notes. This sets the foundation for your full-stack note-taking application to store and retrieve data from a MongoDB database.
Connecting Front-End to Back-End
Making API Requests from React
Axios Installation:
Axios is a popular library for making HTTP requests from the browser. Install Axios in your React project:
npm install axios
Creating API Service:
Create a new folder named
servicesinside yoursrcdirectory. This folder will contain your API service files.Inside
services, create a new file namedapi.js:import axios from 'axios'; const baseURL = 'http://localhost:3001/api'; // Change URL based on your server setup const api = axios.create({ baseURL, headers: { 'Content-Type': 'application/json', }, }); export const getNotes = async () => { const response = await api.get('/notes'); return response.data; }; export const addNote = async (note) => { const response = await api.post('/notes', note); return response.data; }; export const updateNote = async (id, note) => { const response = await api.put(`/notes/${id}`, note); return response.data; }; export const deleteNote = async (id) => { const response = await api.delete(`/notes/${id}`); return response.data; }; export default api;In this file, we define functions to interact with the API endpoints we created in the Node.js server. These functions use Axios to make HTTP requests to the server.
Handling Data in React Components
- State Management:
In your React components where you want to use data from the API, add the appropriate modifications to allow them manage state to store and update that data.
For example, in
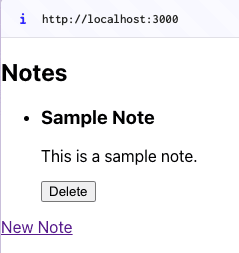
NoteList.js, you might have:import React, { useState, useEffect } from 'react'; import { getNotes, deleteNote } from '../services/api'; function NoteList() { const [notes, setNotes] = useState([]); useEffect(() => { fetchNotes(); }, []); const fetchNotes = async () => { try { const data = await getNotes(); setNotes(data); } catch (error) { console.error('Error fetching notes:', error); } }; const handleDelete = async (id) => { try { await deleteNote(id); // Filter out the deleted note from state setNotes(notes.filter((note) => note.id !== id)); } catch (error) { console.error('Error deleting note:', error); } }; return ( <div> <h2>Notes</h2> <ul> {notes.map((note) => ( <li key={note.id}> <h3>{note.title}</h3> <p>{note.content}</p> <button onClick={() => handleDelete(note.id)}>Delete</button> </li> ))} </ul> </div> ); } export default NoteList;This example component fetches notes when it's rendered (using
useEffect) and displays them in a list. It also provides a button to delete a note.
Form Handling:
- For adding or updating notes, you'll need form components to gather user input.
- Example
NoteForm.jsfor adding a new note:
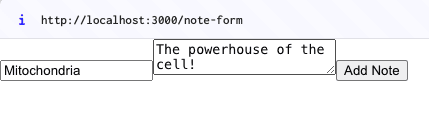
import React, { useState } from "react"; import { addNote } from "../services/api"; function NoteForm() { const [title, setTitle] = useState(""); const [content, setContent] = useState(""); const handleSubmit = async (e) => { e.preventDefault(); try { await addNote({ title, content }); setTitle(""); setContent(""); window.location.href = "/"; } catch (error) { console.error("Error adding note:", error); } }; return ( <form onSubmit={handleSubmit}> <input type="text" placeholder="Title" value={title} onChange={(e) => setTitle(e.target.value)} /> <textarea placeholder="Content" value={content} onChange={(e) => setContent(e.target.value)} /> <button type="submit">Add Note</button> </form> ); } export default NoteForm;- This form component captures input values, sends them to the
addNotefunction upon submission, and resets the form on successful addition.
Updating Data:
- Similarly, you can create an update form to edit existing notes, using the
updateNotefunction from the API service.
- Similarly, you can create an update form to edit existing notes, using the
- Integrating Components:
- Finally, integrate these components into your main
App.jsor other relevant components to create a cohesive user interface for your note-taking application.
- Finally, integrate these components into your main
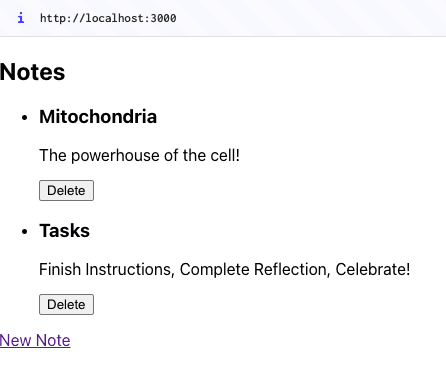
Upon completing these steps, your React front-end is now connected to the Node.js back-end through API requests. Data can be fetched, added, updated, and deleted from your MongoDB database via the defined API endpoints. The React components manage this data flow and ensure a responsive and interactive user experience for your note-taking application.
Conclusion
In this guide, we covered the steps to create a full-stack note-taking application using React, Node.js, and MongoDB. Here's a recap of what we accomplished:
Front-End Setup with React:
- Created a new React application using
create-react-app. - Installed necessary dependencies such as React Router for navigation.
- Built basic components like
NoteList,NoteForm, and others to structure the front-end.
- Created a new React application using
Back-End Setup with Node.js:
- Set up a Node.js server using Express.
- Installed required packages like
mongoose,cors, anddotenv. - Created API endpoints for CRUD operations (
GET,POST,PUT,DELETE) for notes.
Database Configuration with MongoDB:
- Installed and ran MongoDB locally.
- Connected Node.js to MongoDB using Mongoose.
- Defined a schema for notes and performed basic CRUD operations.
Connecting Front-End to Back-End:
- Made API requests from React using Axios.
- Handled data in React components, fetching and displaying notes.
- Implemented features like adding new notes and deleting existing ones.
By now, you should have a solid foundation for learning and exploring the world of full-stack web development with React, Node.js, and MongoDB. You can continue to enhance your note-taking application, making it more feature-rich, user-friendly, and scalable.